Microsoft 365 Exchange Online
Now that organizations are transitioning to the cloud, learning how to use PowerShell for administering Microsoft 365 Exchange Online becomes vital for IT support specialists. This guide will be highlighting the following steps:
- How to connect to Microsoft Exchange Online PowerShell
- How to change and remove mailbox permissions
- How to change and remove calendar permissions
Introduction to PowerShell
PowerShell, developed by Microsoft, is a cross-platform tools that integrates command-line shell, a scripting language, and a configuration management framework. It is designed to assist Help Desk Support and Network Administrators to streamline their IT infrastructures. PowerShell is a scripting language commonly used for automating the management of systems.
Microsoft provides extensive online documentation and sample scripts tailored to various use-case scenarios. The official PowerShell documentation is an excellent starting point for anyone looking to learn the fundamentals or explore advanced functionalities.
How to connect to Microsoft Exchange Online PowerShell
Run PowerShell as Administrator. To verify PowerShell version, open PowerShell as administrator and type in:
$PSVersiontable
In case that you need to update to PowerShell version 7.5.0, proceed to download and install it via Github here. Based on Microsoft detailed guide on how to Connect to Exchange Online PowerShell, it is important to install the module (if it is not already installed). To Install the Microsoft 365 Exchange Online PowerShell Module, use the following PowerShell command.
Install-Module PowerShellGet -Force -AllowClobber
Step 1: Load the Exchange Online PowerShell Module Once the module is installed, proceed to open a PowerShell window and load the module by running the following command:
Import-Module ExchangeOnlineManagement
Step 2: Connect and authenticate Run this command in PowerShell to connect and authenticate
**Connect-ExchangeOnline -UserPrincipalName
For PowerShell 7 for accounts without MFA, use:
Connect-ExchangeOnline -UserPrincipalName navin@contoso.onmicrosoft.com -InlineCredential
To sign in, use a web browser to open the page [https://microsoft.com/devicelogin](https://microsoft.com/devicelogin) and enter the code
Step 3: Disconnect when you are finished.
Disconnect-ExchangeOnline
To update the Module (Later On)
Update-Module -Name ExchangeOnlineManagement
How to change mailbox permissions
In this article, we will be looking at the three main permission types: Full Access, Send As, and Send on Behalf. For more information from Microsoft on mailbox folder permissions, click on: Get-MailboxFolderPermission and Add-MailboxFolderPermission To get current user’s mailbox folder permissions, use the following command line in PowerShell:
Get-MailboxFolderPermission -Identity user@domain.com
Example 1: Full Access (Access the Entire Mailbox)
Add-MailboxPerission -Identity “user@example.com” -User “delegate@example.com” -AccessRights FullAccess -InheritanceType All
Example 2: Send As (Send emails as if they were from the mailbox owner)
Add-RecipientPermission -Identity “user@example.com” -Trustee “delegate@example.com” -AccessRights SendAs
Example 3: Send on Behalf (Shows “sent on behalf of”)
Set-Mailbox -Identity “user@example.com” -GrantSendOnBehalfTo “delegate@example.com”
How to remove Mailbox Permission
The process to remove Mailbox Permissions is straightforward by using Remove-MailboxPermission commands.
Example 1: Full Access (Access the Entire Mailbox)
Remove-MailboxPermission -Identity user@domain.com -User otheruser@domain.com -AccessRights FullAccess -Confirm:$false
Example 2: Send As
Remove-RecipientPermission -Identity user@domain.com -Trustee otheruser@domain.com -AccessRights SendAs -Confirm:$false
Example 3: Send on Behalf Set-Mailbox -Identity user@domain.com -GrantSendOnBehalfTo @{Remove=”otheruser@domain.com”}
How to change calendar permissions
First, check calendar permissions set on a mailbox folder, specifically the Calendar folder of a mailbox name “events” with the following command below. This PowerShell command lists, who has access to the calendar of the events mailbox and what level of access they have (Reviewer, Editor, Owner, etc).
Get-MailboxFolderPermission -Identity events:\calendar
An example output might look like this image below.
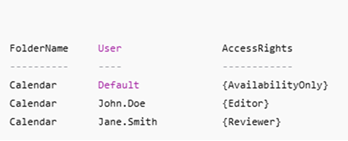
Sample Current Calendar Permissions
Example 1: Reviewer (read-only access to calendar)
Add-MailboxFolderPermission -Identity user@example.com \Calendar -User “delegate@example.com” -AccessRights Reviewer
Example 2: Editor (Read / Write)
Add-MailboxFolderPermission -Identity user@example.com \Calendar -User “delegate@example.com” -AccessRights Owner
Example 3: Owner (Full Control)
Add-MailboxFolderPermission -Identity user@example.com \Calendar -User “delegate@example.com” -AccessRights Owner
Example 4: Remove Calendar Permissions
Remove-MailboxFolderPermission -Identity user@domain.com:\Calendar -User otheruser@domain.com
Microsoft does offer a Graphical Interface route. Keep in mind that the PowerShell commands can be an easier route for mailbox and calendar shares. Check out this Microsoft video for further reference: Create a Shared Calendar.
| Here is a Microsoft 365 Exchange command line cheat sheet that focuses on mailbox and calendar permissions. Even thought users can delegate Calendar sharing in Microsoft 365, there might be scenarios in which IT staff are requested to change the permission levels on a particular staff member. To learn more about the difference calendar permission, visit [CalendarPermissionLevel | Microsoft](https://learn.microsoft.com/en-us/exchange/client-developer/web-service-reference/calendarpermissionlevel). |
Support This Project
If you find these guides helpful, consider supporting the project.
Your support helps:
- Maintain and update documentation
- Add new troubleshooting guides
- Improve clarity and accuracy